By Alexander Merz · Updated on · Details checked on 6 October 2026
More in our overview: Astrophotography.
What Is Sampling?
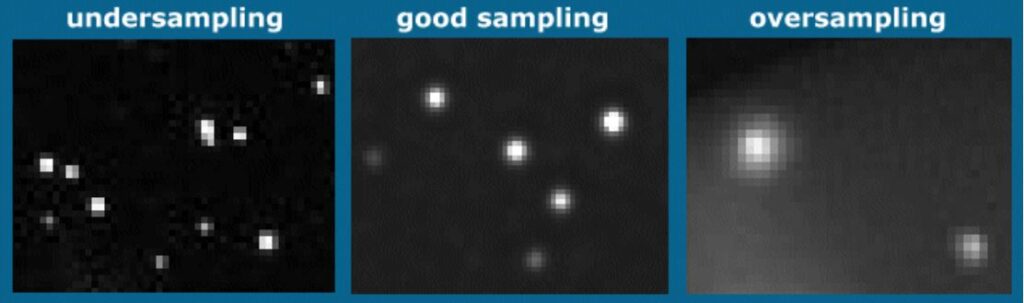
Sampling describes how many pixels in the sensor represent an image being photographed. If we have too few pixels sampling the object, the image appears “blocky” or “pixelated”, since the smallest unit of information is a square pixel. This would be called undersampling. The opposite would be oversampling: more on that later.
You might think it is better to have the smallest possible pixels in order to avoid undersampling, because the more pixels represent an image, the smoother the shape becomes.
As mentioned above, however, it is not that simple. The reason: how much detail we can resolve in our telescope, and therefore also capture on a sensor, depends on the physics of light, the telescope and the seeing (atmospheric turbulence).
The physics of light refers to diffraction effects, which however play no role for most telescopes, because the often decisive bottleneck is the seeing.
What Is Seeing?
Seeing is the phenomenon that stars, viewed from Earth, flicker and twinkle. Seeing varies from place to place and day to day, because it is mainly based on the turbulent mixing of air masses in the atmosphere. This mixing of air masses of different temperatures refracts light like a lens, to a different degree depending on the wavelength.
As a result, on close inspection even point-like objects such as stars or very fine details of a planet’s surface are not imaged as points, but smeared and spread out.
Seeing is given in arcseconds and is a unit of measurement that describes a fraction of a degree. One arcsecond corresponds roughly to the angle at which a five-millimeter-wide object appears from a distance of one kilometer.
In Germany, average seeing is around 3 arcseconds and thus correspondingly limits the resolving power.
A star that actually spans one arcsecond appears to us 3 arcseconds large due to seeing. This effect comes into play especially with exposure times of several minutes, as are common in deep-sky astrophotography.
Anyone who wants a more precise estimate of the current seeing at their location can consult the FWHM function of camera control programs or find information via seeing apps.
Representing a Round Shape with Square Pixels?
The minimum number of pixels needed to represent a star as approximately round is 3×3 pixels. Put simply, this means that the light of a point-like light source (star) should be sampled by a pixel field with a diameter of 3 pixels in order to approximately represent the information as round.

If we now want to sample a star under the seeing conditions assumed for Germany of 3 arcseconds, we need a pixel size that captures or samples one arcsecond in the night sky. (3 arcseconds from seeing divided by the 3 pixels needed to approximately image a round shape.)
Sampling: Formulas Help with Understanding
How many arcseconds of sky a pixel captures is referred to as the image scale. The image scale, in arcseconds per pixel, is determined by the pixel size p in micrometers, the focal length f of the telescope in millimeters, and a rounded value of an angular function.
*Image scale [arcseconds/pixel] = 206 p [µm] / f [mm]**
For longer exposure times and depending on the seeing, an image scale of 0.67–2 arcseconds per pixel is considered the sweet spot.
Above that we enter the range of undersampling, below it the range of oversampling.
As a reminder:
Undersampling means that too few pixels sample the object, so that it is rendered as “blocky” or “pixelated”.
The opposite would be oversampling: here the information is reproduced across too many pixels in shades of gray, so that the image looks “cloudy and bloated” or “smeared/distorted”.
This is particularly problematic under suboptimal seeing conditions. Oversampling namely means that the distortions caused by poor seeing are sampled and displayed. We gain no information. Anyone who zooms into such an oversampled image only magnifies the blur caused by the seeing.
Resolving Power and the Rayleigh Criterion
The resolving power of a telescope refers to its ability to still separate two closely spaced objects. The larger the aperture of a telescope, the greater its resolving power (see telescope guide).
The Rayleigh criterion states that two point-like light sources can just barely be separated when the first minimum of the diffraction disk (= the image of a point-like light source through an optic) of the first source coincides with the diffraction maximum of the second light source.
The distance (= resolution) of the two brightness maxima is
A [rad] = 1.22 * λ / D
Taking λ=550nm as the average value for visible light and converting to arcseconds, this gives:
Resolving power A [“] = 138.6 / aperture [mm]
We will need this formula to determine the appropriate sampling for our setup of telescope and camera as well as target object (planet or deep-sky object).
We can now calculate the resolution of our telescope. Together with the formula for the image scale, we can determine how the focal length and pixel size of our setup take effect.
Beforehand, however, the resolving power calculated for our telescope must still be divided by 3, because 3 pixels are needed to approximately represent a round shape. (Note: Alternatively, according to Nyquist, 2 pixels would also suffice, but I find the required sampling with 3 pixels more intuitive.)
Practical Examples (Sampling)
Planetary Photography with a Schmidt-Cassegrain 279/2800
We own a Schmidt-Cassegrain telescope with 279 mm aperture and 2800 mm focal length (for example: Celestron EdgeHD SC 1100). Our location is Germany with an average seeing of 3″ [arcseconds].
We want to do planetary photography (lucky imaging):
Resolving power A [“] = 138.6 / 279 = 0.5 arcseconds
We fundamentally need 3 pixels for the approximate representation of a round shape:
Arcseconds per pixel [“/pixel] = 0.5 / 3 = 0.16 ” / pixel
Now we can insert 0.16 ” / pixel into the formula for calculating the image scale and solve for either pixel size or focal length:
*0.16 ” = 206 p [µm] / f [mm]**
Normally, at the beginning one owns an astro camera with a defined pixel size.
A popular dedicated astro camera is, for example, the ZWO Kamera ASI 178 MC Color with a very small pixel size of 2.4 µm. (DSLR cameras such as the Canon Kamera EOS 4000 Da have, for example, 4.3 µm.)
*0.16 ” = 206 2.4 / f [mm] rearranged for focal length f = 3090 mm**
This focal length roughly matches the native focal length of the telescope and could work in this setup for planetary photography.
Deep-Sky Photography with a Schmidt-Cassegrain 279/2800
One can already sense that the setup (Schmidt-Cassegrain 279mm/2800mm and 2.4 µm camera) from the previous example is possibly unsuitable for long-exposure deep-sky astrophotography.
For longer exposure times, seeing becomes the limiting factor. With a seeing of 3 arcseconds, we want a pixel to sample one arcsecond.
*1 ” = 206 2.4 / f [mm] rearranged for focal length f = 494 mm**
Now one would have to massively reduce the native focal length of the telescope. However, a 0.17x reducer does not exist. One can now resort to the software-assisted combining of several pixels into one large pixel (binning). For the camera in question, binning of 2×2, 3×3 or 4×4 is possible.
With 4×4 binning, a pixel calculated this way would be 9.6 µm in size. Inserted into the formula:
*1 ” = 206 9.6 / f [mm] rearranged for focal length f = 1978 mm.**
Now it would be possible to obtain the desired focal length with a 0.7x reducer.
One can see here that the very small pixel size of the sensor requires quite a bit of compensation.
Better: one acquires a second telescope (OTA = Optical Tube Assembly) whose focal ratio is better suited for deep-sky astrophotography with this camera, or an additional camera with significantly larger pixels.
Planetary Photography with a Newtonian 200/1000
We own a Newtonian telescope with 200 mm aperture and 1000 mm focal length. Our location is Germany with an average seeing of 3″ [arcseconds].
We want to do planetary photography (lucky imaging):
Resolving power A [“] = 138.6 / 200 = 0.69 arcseconds
Arcseconds per pixel [“/pixel] = 0.69 / 3 = 0.23 ” / pixel
*0.23 ” = 206 2.4 / f [mm] rearranged for focal length f = 2140 mm**
So for planetary photography we need a significantly longer focal length than the native focal length of 1000 mm of the telescope. We achieve this with a high-quality 2x Barlow lens.
Deep-Sky Photography with a Newtonian 200/1000
For deep-sky photography, our Newtonian is better suited.
For longer exposure times, seeing becomes the limiting factor. With a seeing of 3 arcseconds, we want a pixel to sample one arcsecond.
*1 ” = 206 2.4 / f [mm] rearranged for focal length f = 494 mm**
A focal length reduction by a factor of 0.5x would be possible with a reducer. However, it once again shows that such small pixels lead to problems or a need for adjustment in astrophotography.
That is why cooled CCD cameras, which can be described as the gold standard in deep-sky astrophotography, often have moderately large pixels such as the Atik Kamera 383L+ Mono (pixel size of 5.4 µm).
With this camera, no optical aids would be necessary.
Pixel Size and Noise
Smaller pixels have an unfavorable signal-to-noise ratio compared to larger pixels at the same signal. Oversampled images with small-pixel sensors in particular show pronounced noise.
So Which Pixel Size After All?
The trend is toward ever smaller pixels in sensors. These sensors, however, are not developed specifically for astrophotography. A universally valid statement is difficult to make, because there are always certain situations or setups in which a particular pixel size offers more advantages; nevertheless, for most areas of astrophotography pixel sizes around 4-5 µm are the more sensible choice.
In my assessment, pixels that are too small limit the possibilities. But as with the telescope itself, there is no do-it-all camera that delivers uncompromisingly good results. Anyone who wants to move up into the professional league in astrophotography will acquire two cameras.
Everyone else is well served with a pixel size of around 4-5 µm.
Which Is Worse: Oversampling or Undersampling?
Most often, a range of 0.67 – 2″ / pixel is suggested for sampling. This range applies above all to the astrophotography of deep-sky objects.
For planetary photography, depending on the telescope, one will try on clear nights with good seeing to use the telescope’s resolving power in order to achieve better images more in the oversampling range than with undersampling.
For deep-sky astrophotography, slight undersampling often leads to better images through a better signal-to-noise ratio and more detailed representation than with oversampling.