By Alexander Merz · Updated on · Details checked on 7 October 2026
Astrophotography is a fascinating discipline that allows us to capture the beauty of the night sky and explore the wonders of the universe. By combining photography and astronomy, amateur astronomers and photographers can create stunning images of stars, planets, galaxies and other celestial bodies. What you need for this: an astrophotography camera
⭐ In short: what actually matters
A good astrophotography camera comes down to four things: sensor type (modern CMOS beats old CCD for almost everyone), mono vs. colour (colour for simplicity, mono for maximum detail), cooling (a regulated cooled sensor keeps noise low on long exposures), and a sensor that fits your telescope (pixel size vs. focal length). The rest of this guide explains each one in plain language.
The basics of astrophotography
Before deciding on a dedicated astronomy camera, it is important to understand some of the basics of astrophotography. This includes knowing the various celestial objects you want to photograph, as well as the techniques for obtaining sharp, well-exposed images. Long exposures, tracking and image processing are essential skills you should master in astrophotography.
The difference between a regular astrophotography camera and a dedicated astronomy camera
While you can take impressive astrophotographs with conventional DSLRs or mirrorless cameras, dedicated astronomy cameras have been developed specifically for the demands of astrophotography. They have a few important differences that make them better suited to the task.
These include the use of special sensors that are better suited to low-light situations, as well as advanced cooling systems that reduce image noise. In addition, dedicated astronomy cameras are usually either monochrome or colour, which increases the flexibility of capturing and processing astrophotographs.
CMOS versus CCD sensors
If you decide on a dedicated astronomy camera, you should first learn about the two main types of image sensors used in these cameras: CMOS (Complementary Metal-Oxide-Semiconductor) and CCD (Charge-Coupled Device). Both sensor types have their own advantages and disadvantages, and the choice between them depends on individual requirements and budget.
| CMOS (modern) | CCD (legacy) | |
|---|---|---|
| Price | ✅ Affordable | ❌ Expensive |
| Low-light / high ISO | ✅ Excellent | ➖ Good |
| Read speed | ✅ Fast | ❌ Slow |
| Power draw | ✅ Low | ❌ High |
| Best for | Almost everyone today | A few legacy setups |
CMOS sensors
CMOS sensors are widely used in most modern cameras, including DSLRs and mirrorless cameras. They are generally more affordable than CCD sensors and offer better performance at high ISO values, which makes them suitable for low-light situations such as astrophotography. CMOS sensors also have the advantage of consuming less power, which can be beneficial during long exposures.
Advantages of CMOS sensors:
- More affordable than CCD sensors
- Better performance at high ISO values
- Lower power consumption
- Faster image processing
Disadvantages of CMOS sensors:
- Potentially higher image noise during longer exposures
- Less uniform sensitivity across the entire sensor
CCD sensors
CCD sensors were long the preferred choice for astrophotographers, as they offer lower image noise and better sensitivity across the entire sensor area. However, they are generally more expensive than CMOS sensors and consume more power. In recent years, though, the differences between CMOS and CCD sensors have narrowed, and many astrophotographers now choose CMOS sensors because of their cost-efficiency and improved performance at high ISO values.
Advantages of CCD sensors:
- Lower image noise
- Better sensitivity across the entire sensor area
Disadvantages of CCD sensors:
- More expensive than CMOS sensors
- Higher power consumption
- Slower image processing
When choosing between CMOS and CCD sensors, you should carefully weigh your own requirements and budget. If you are looking for an affordable solution and are willing to accept possibly somewhat higher noise levels, a CMOS sensor might be the right choice. If, however, more uniform sensitivity and lower noise are the top priority and you are willing to spend more money, a CCD sensor might be better suited.
Binning with CMOS and CCD sensors
Binning is a process in which neighbouring pixels are combined to form a “superpixel”. This is equally possible with CMOS sensors and CCD sensors.
During binning, resolution is reduced but sensitivity is increased. If you perform 2×2 binning, for example, four pixels are combined into one. This means that the image resolution is reduced to a quarter, but the sensitivity increases by a factor of
Binning is a method of improving the signal-to-noise ratio in an image. Several pixels are combined and treated as a single pixel. This leads to a stronger signal, because more photons are captured, but also to higher noise, because the noise of the individual pixels adds up.
Both sensor types, CMOS and CCD, support binning. However, there are differences in the way binning is implemented. CCD sensors normally use hardware binning, in which the pixels are actually combined. This results in higher effectiveness in noise reduction, but also in a lower dynamic range, because the brightness levels are reduced.
CMOS sensors, on the other hand, normally use software binning, in which the pixels are not physically combined; instead, the software recalculates the image afterwards. This results in a higher dynamic range, but also in lower noise-reduction effectiveness.
As a rule, software binning is the better choice for deep-sky imaging because of its higher dynamic range. For planetary imaging, hardware binning can be more sensible because of its higher noise-reduction effectiveness. It is important to note, however, that binning also leads to lower resolution, as fewer pixels are available.
Astrophotography camera: monochrome or colour
When selecting a dedicated astronomy camera, you should also decide whether you want to use a monochrome or a colour camera. Both options have their own advantages and disadvantages, and the choice depends on individual requirements, budget and level of experience.
Monochrome cameras
Monochrome cameras generally offer higher sensitivity and image quality than colour cameras, but they require additional equipment, more time and a more complex workflow. Since they only capture black-and-white images, it is necessary to use LRGB filters or narrowband filters and to take several exposure series in order to ultimately create a colour image.
Advantages of monochrome cameras:
- Higher sensitivity and image quality
- Better control over colour channels
- Ability to create narrowband images
Disadvantages of monochrome cameras:
- Requires additional equipment (filters)
- More time-consuming and more complex workflow
- Higher financial outlay
Colour cameras
Colour cameras are easier to handle and require less additional equipment and time compared to monochrome cameras. However, the image quality is generally not as high as with monochrome cameras, and you have less control over the colour channels.
Advantages of colour cameras:
- Simpler workflow
- Lower financial outlay
- No additional filters required
Disadvantages of colour cameras:
- Lower sensitivity and image quality compared to monochrome cameras
- Less control over colour channels
If you are new to astrophotography or have a limited budget, a colour camera might be the best way to start. If, however, you are willing to invest more time, money and effort to achieve the best possible image quality, a monochrome camera is worth considering.
Colour camera aside: the Bayer matrix
The Bayer matrix is an arrangement of colour filters on a CMOS sensor used in most colour cameras. It consists of a grid of red, green and blue filters arranged in specific patterns to capture colour information. A pixel in the matrix contains information about only one of the three colours — red, green or blue — and therefore requires interpolation to produce the final colour image.
The advantage of the Bayer matrix is that it makes it possible to capture a colour image in a single exposure, which simplifies the workflow and reduces the total time needed for capture and post-processing.
One disadvantage of the Bayer matrix, however, is that the interpolation can lead to a reduction in the actual resolution of the image. Smaller colour nuances can also be lost through the interpolation, which can result in less realistic colours.
Monochrome cameras, which do not use a Bayer filter, are able to capture more detail and sharpness in the images, because each pixel receives the full information of the light. However, they also require a more complicated workflow and are generally more expensive than colour cameras.
🎯 Colour or mono — which should you choose?
Colour (OSC): the easy path — a single exposure captures the full-colour image. Ideal for beginners and anyone short on clear nights.
Mono + filters: more gear and more processing, but the highest resolution and the only way to shoot narrowband from a light-polluted city. Step up to it once astrophotography has truly hooked you.
Filters: for advanced astrophotography camera users
Filters are important tools in astrophotography, especially when using monochrome cameras. They make it possible to isolate specific wavelengths of light and can help to capture high-quality images. In this chapter, both LRGB and narrowband filters are covered.
LRGB filters
LRGB filters consist of luminance, red, green and blue filters. They are used to isolate different colour channels in monochrome images so that they can later be combined into a colour image during post-processing. The luminance filter serves to capture the detail of an object by letting through a broader spectrum of wavelengths.
Narrowband filters
Narrowband filters are special filters that let through only a very narrow band of light wavelengths. The three most common narrowband filters are hydrogen-alpha (Ha), oxygen (OIII) and sulphur (SII). These filters block almost all light, including light pollution and moonlight, and let through only the desired wavelengths.
Using filters
LRGB filters require four sets of photos that are stacked independently of one another and then combined during post-processing to create a colour image. Narrowband imaging requires at least two of the narrowband filters, and the resulting images are likewise combined during post-processing.
Advantages of filters
- Improved image quality through the isolation of specific wavelengths
- Increased detail and contrast
- Ability to create artistic and unique colour palettes in narrowband imaging
Disadvantages of filters
- Additional costs for acquiring the filters
- Increased workload when capturing and processing images
- In narrowband imaging, colours are not “real” and require artistic decisions during post-processing
Tips for using filters
- Make sure the filters are correctly attached to your telescope or filter wheel
- Experiment with different exposure times and settings in order to achieve the best results
- Practise patience when stacking and processing images in order to reach the best possible end result
Feels like a lot? A dedicated camera is just one part of a full rig (you also need a telescope, mount and guiding). If you simply want deep-sky photos tonight, an all-in-one smart telescope is essentially the camera, optics and mount in a single app-controlled box:
Easiest way to start: ZWO Seestar S30 Pro Smart Telescope

ZWO's benchmark smart telescope: a polished app, mosaic mode and stunning results in minutes.
Price: € 699
Matching the astrophotography camera and telescope
To achieve the best possible results in astrophotography, it is important that your camera and telescope are well matched to each other. In this chapter, we will focus on a few factors to consider when selecting and matching a camera and telescope.
Pixel size
The pixel size of your camera has a major influence on the type of images you can take. A camera with the right pixel size for your telescope or lens is crucial for optimal results.
Sensor size
The sensor size of your camera influences the field of view and the performance in poor lighting conditions. Full-frame sensors generally offer better performance in poor lighting conditions and a larger field of view. Sensors with smaller dimensions have a crop factor that must be taken into account when calculating the field of view.
Calculating arcseconds per pixel
A simple formula for finding out how well your camera-and-telescope setup match is: (pixel size / focal length) x 206 = arcseconds per pixel. Ideally, this number should be between 1 and 2. If the number is above 2, you need more magnification or smaller pixels. If the number is below 1, you have too much magnification.
You can quickly calculate this here: Astrophotography Calculator
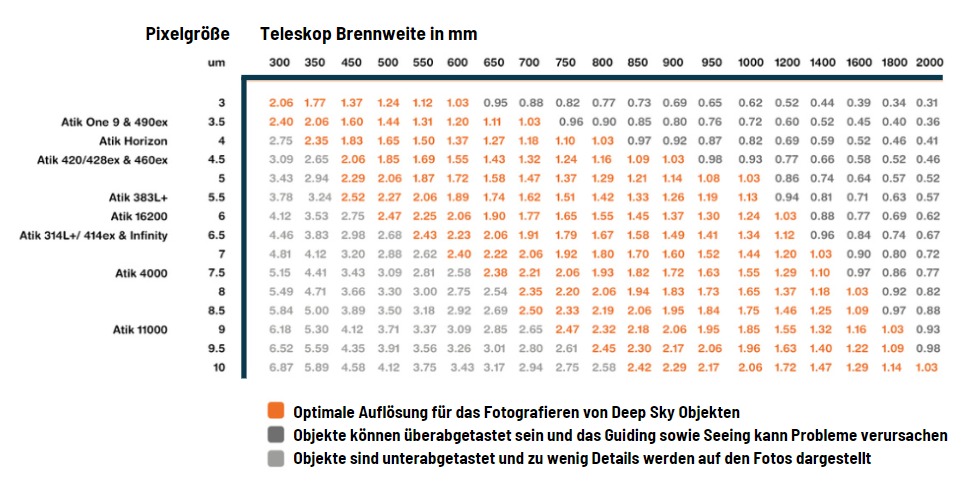
More on this here: Pixel size and sampling
💡 Rule of thumb
Skip the maths: aim for roughly 1–2 arcseconds per pixel for deep-sky imaging under typical skies. Below that you are over-sampling (bigger files, no extra detail); far above it and stars look blocky. An online sampling calculator works it out in seconds.
Adjusting the focal length
You can change the focal length of your telescope or lens in order to achieve a better match with your camera. Barlow lenses and reducers can be used to lengthen or shorten the focal length, which increases the flexibility of your setup.
Cooling and noise reduction
In astrophotography, reducing noise is a crucial factor in obtaining high-quality images. In this chapter, we will look at the benefits of cooling astronomy cameras and how it can contribute to noise reduction.
Why is cooling important?
The sensors in cameras generate heat when they are in operation. This heat can lead to increased noise in your images, especially during the long exposures that are common in astrophotography. By cooling the sensor, heat build-up can be reduced and noise thereby decreased.
Active cooling
Some dedicated astronomy cameras have an active cooling system that keeps the sensor at a constant temperature below the ambient temperature. This helps to reduce noise even further, which is particularly advantageous in warm ambient temperatures.
Dark frames and bias frames
To reduce the noise in your astrophotographs even further, you can take dark frames and bias frames. Dark frames are images taken with the same exposure time and temperature as your light frames, but with the lens or telescope covered. They help to correct the thermal noise in your images.
Bias frames are the shortest possible exposures of your camera with the shutter closed, which serve to capture the electronic noise of the sensor. Both dark frames and bias frames are used during image processing to reduce the noise in your final images.
⚠️ Don’t skip cooling for deep-sky
Thermal noise roughly doubles for every 6–7 °C the sensor warms up. For long deep-sky exposures, a regulated (set-point) cooled camera is the single biggest step toward clean images — and it makes your calibration frames actually repeatable.
Connectivity and compatibility
Before buying an astronomy camera, it is important to make sure that it is compatible both with the telescope or lens and with the computer or other devices you want to use to control and process the images. In this chapter, we will discuss a few important points to consider regarding connectivity and compatibility.
Telescope and lens connections
It is crucial that the astronomy camera can be connected to the telescope or lens. Make sure that the camera has the correct connection, which is compatible with the telescope or lens. Some of the common connection standards are T2, M42 and M48 threads. If necessary, you can also use adapters to connect the camera to the telescope or lens.
Filter wheel and filters
If you plan to use a filter wheel and filters for your astronomy camera, these should also be compatible. Make sure that both the filter wheel and the filters are suitable for the camera type and the telescope or lens.
Computer requirements of your astrophotography camera
Astronomy cameras must be connected to a computer in order to control the images and store them. It is therefore important that the camera is compatible with the computer’s operating system. Make sure that the camera has the necessary drivers and software suitable for the computer’s operating system. Also take into account the camera’s system requirements in terms of processor, memory and hard-disk space, in order to ensure that the computer is powerful enough to control the camera and process the images.
Camera connections
The astronomy camera must have suitable connection options for linking it to the computer and other devices. USB is the most frequently used connection for astronomy cameras. Make sure that the camera has the appropriate USB connection (e.g. USB 2.0, USB 3.0) and that the computer likewise has a corresponding USB port. There are also cameras with an Ethernet connection or Wi-Fi functions, which can offer additional connection options.
By taking these aspects of connectivity and compatibility into account, you ensure that you choose an astronomy camera that can be integrated smoothly into your existing setup and works reliably.
The camera only makes sense together with the right telescope and mount.
Six short questions, an honest answer by email – even when binoculars are the better choice.
Recommendations for an astrophotography camera in different use cases
There are various use cases in astrophotography, and depending on individual needs and goals, a particular astronomy camera may be better suited than another. In this section, we give recommendations for some of the most important situations and applications.
Beginners in astrophotography
For beginners who are just starting out in astrophotography, we recommend a camera that is easy to use and affordable. The ZWO ASI294MC ProZWO ASI294MC Pro* is an excellent choice, as it is available as both a colour and a monochrome camera. It has high sensitivity and features integrated cooling. It is also compatible with many telescopes and lenses.
A cooled astro camera only becomes practical with a controller: the ZWO ASIAIR ties camera, mount, guiding and focuser into a single app – our review explains who it is worth it for.
Deep-sky photography
For those who want to focus on photographing deep-sky objects such as galaxies, nebulae and star clusters, we recommend a camera with high sensitivity and cooling, such as the ZWO ASI2600MM Pro MonoZWO ASI2600MM Pro Mono*. This camera offers high resolution and good low-light performance, which is ideal for capturing deep-sky objects. This particular variant is the Mono version, which should be combined with a filter wheel. A colour version is also available.
More on this topic: Deep-Sky Astrophotography – An Introduction
Planetary photography
If the main goal is planetary photography, we recommend a camera with a high frame rate and resolution, such as the ZWO ASI294MC ColorZWO ASI294MC Color*. This camera makes it possible to capture many images per second, which is especially useful for catching the best moments of planetary observation and minimising atmospheric disturbances.
More on this topic: Planetary Photography [2023] – Guide and Tutorial
Narrowband astrophotography
For narrowband astrophotography, in which special filters are used to reduce light pollution and highlight detail in emission nebulae, we recommend a monochrome camera such as the QHY183MQHY183M*. This camera offers high sensitivity and resolution and is excellently suited for use with narrowband filters.