By Alexander Merz · Published on · Details checked on 14 September 2026
Anyone scrolling through social media comes across spectacular shots of galaxies, nebulae and star clusters more and more often. Yet looking directly through the telescope can be disappointing: instead of colourful details, you discover only faint, grey veils. This is where an optimally matched astrophotography setup comes into play. It makes it possible to capture exactly those details that the naked eye cannot register in real time.
What lies behind an optimal astrophotography setup?
An astrophotography setup comprises all the components needed for successful sky imaging: from the precise mount through the telescope and the camera to accessories such as autoguiding and a motorised focuser.

A good setup stands out through:
- A perfect interplay: all parts should be optimally matched to one another.
- Modularity: an easy start, with the option to expand later for more demanding images.
- Portability: many observing sites lie outside the cities. A portable setup makes spontaneous photo trips easier.
Camera or complete system?
In astrophotography you basically have two paths:
- Individual components: you assemble each component (camera, telescope, mount, etc.) yourself. This creates an individual astrophotography setup that perfectly matches your own ideas.
- Smart telescopes: complete systems like Unistellar, Celestron or Vaonis are quickly ready to go and allow impressive images without having to dive deep into the technology.
The choice depends on your personal ambitions: those seeking more freedom and learning potential will tend to choose their own setup. Those who want quick results and as conveniently as possible will rather reach for the smart telescope.
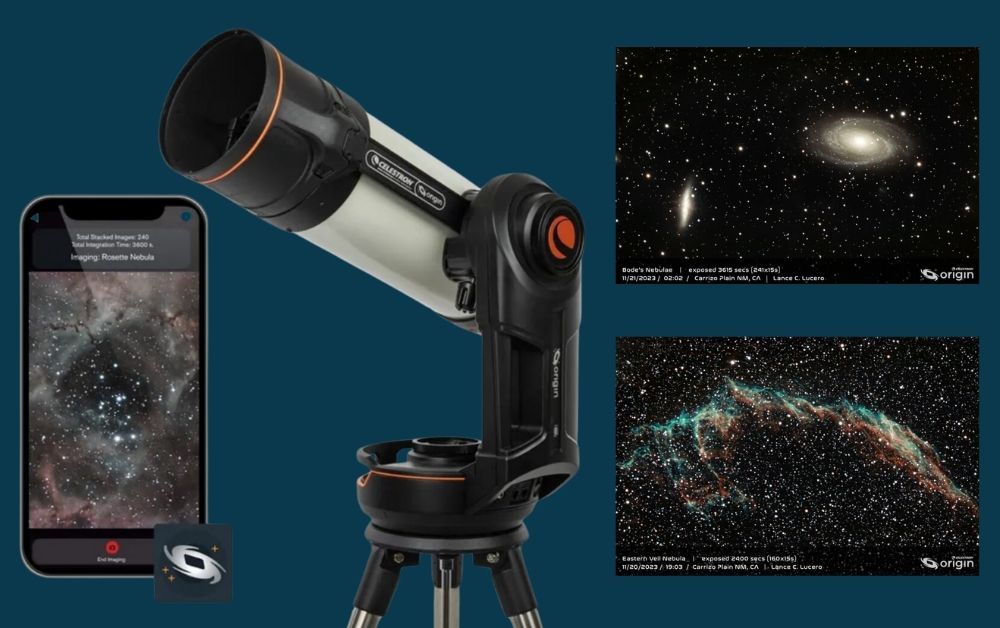
(Celestron Smart Telescope S 152/335*, around € 4,599)
The classic path of astrophotography
The traditional, “classic” path is aimed at everyone who loves technology and is willing to engage in depth with the details:
- Fine-tuning: several nights are invested to perfect the focus, the tracking and the image processing.
- Long exposures: to make faint deep-sky objects visible, exposure series lasting hours are often taken.
- Passion and patience: the end result is an outstanding photo – rewarded with exceptional details and colours.
The quick and convenient way in
Smart telescopes offer a convenient way to take your first steps in astrophotography:
- App control: no complicated mount setup required.
- Quick results: within a few minutes you already get your first impressive shots.
- Limitations: anyone who later wants to delve deeper into the subject quickly reaches its limits here.
The golden middle path for dreamlike astrophotos
Many amateur astronomers want an astrophotography setup that, on the one hand, sets up quickly and, on the other, leaves enough room for high-quality shots. This setup should:
- Be ready to use quickly: in a short time you can take your first live shots.
- Be expandable: anyone who later wants to invest more time and know-how can extend their setup (e.g. with other telescopes or cameras).
 Our partner shop: a trusted US astronomy retailer – telescopes, binoculars & accessories.Visit High Point Scientific* →
Through this combination you achieve both: quick snapshots and professional deep-sky astrophotography.
The equipment in detail [example]
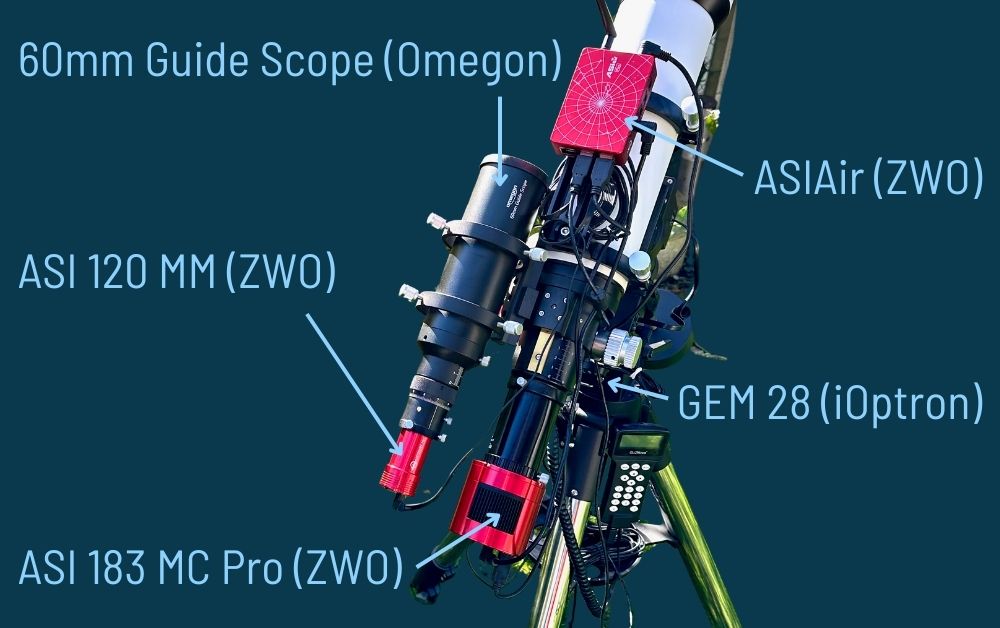
In the following we present one possible configuration with which you get a versatile astrophotography setup. This gives you great ease of use and the flexibility to take further steps towards professional photography if needed.
The mount
A precise yet lightweight mount is the foundation of every astrophotography setup.
iOptron GEM 28* – around € 1,585
- Low weight, high accuracy.
- Equipped with the iPolar system, which enables convenient polar alignment via the laptop.
- Can be combined with a power bank to be independent of the mains during mobile use.
The optics
The telescope determines which field and how much light you capture.
Apochromatic refractor Pro APO AP 96/575 Triplet ED FCD-100* – around $1,799.95€ 1,290
- Compact dimensions, ideal focal length for many deep-sky objects.
- Perfect for colour-faithful shots and still lets large nebulae or star clusters fit into the field of view.
The camera
For sharp, detail-rich photos, a camera with a cooling function is recommended:
ZWO ASI 183 MC Pro – cooled colour camera (1″ sensor)* – around € 999
- Minimised noise thanks to cooling (up to 30 °C below ambient temperature).
- High sensitivity for faint objects.
- Versatile: deep-sky and planetary photography
Guiding
Even well-adjusted mounts will show the tiniest inaccuracies over longer exposures.
Guide scope* (e.g. 60 mm) and monochrome camera (ZWO ASI 120MM*) – around € 159 / € 229
- Measures the deviation and corrects the mount continuously, so that stars stay point-like.
Motorised focuser
For perfect sharpness, a motorised focuser is ideal.
ZWO Motorfokus EAF-N* – around € 275
- Does away with turning the focus wheel manually.
- Finest, computer-controlled focus changes possible.
The ASIAir astro computer
The heart of the astrophotography setup is a mini computer that controls everything:
ASIAirASIAir* astro computer – around $399.00€ 499
- Bundles the mount, main camera, guiding camera and focus motor.
- Is operated via an app. This lets you easily control the complete setup via smartphone or tablet.
How the astro computer performs in practice – setup, app operation and where its limits lie – you can read in our detailed review of the ZWO ASIAIR.
Assembly step by step
Despite the many components, the assembly can be completed quickly:
- Mount & tripod
- Set up and level. Attach the counterweight.
- Attach the main telescope
- Mount the apochromat, screw everything down securely.
- Mount the guide scope
- Slide it into the intended bracket parallel to the main telescope.
- Attach the camera
- Insert the main camera into the focuser via the adapter.
- Insert the guiding camera
- Plug it into the guide scope.
- Connect the motorised focuser
- Remove the focus knobs and install the motorised focuser according to the instructions.
- Connect the ASIAir
- Wire the mini computer to the mount, cameras and focus motor.
- Ensure the power supply (power bank or battery solution).
Once these steps are complete, your modular astrophotography setup is ready to use.
Conclusion
A perfectly matched astrophotography setup doesn’t have to be complicated or inaccessible. With a lightweight mount, a suitable apochromat, a cooled colour camera and further accessories such as a guide scope and a motorised focuser, breathtaking sky images are created.
Anyone who takes more time can extend their setup with additional functions and, in the long run, create professional-looking deep-sky photos. At the same time, it is possible, after just a short setup phase, to share first impressive snapshots with friends or on social networks.
In this way, such an astrophotography setup bridges the gap between simple operation and professional image quality – ideal conditions to lose yourself in your very own adventure under the stars.
More articles on the subject
Sources
- Source: https://nc.nimax-img.de/CMS/images/text/glossary/Gro%C3%9F%20(Teaserbild_16_9).jpeg Original image by Sebastian Brummer. Annotations by Sterngucker.de
- Source: https://nc.nimax-img.de/CMS/images/text/glossary/Montiertes_Setup_komplett.jpeg Original image by Sebastian Brummer. Annotations by Sterngucker.de