By Alexander Merz · Published on · Details checked on 6 November 2026
Polar alignment means aligning the polar axis (right ascension axis) of an equatorial mount parallel to Earth’s axis, so that it points at the north celestial pole. You set two things: the altitude of the axis (equal to your latitude) and the direction to true north (Wikipedia, in German).
⭐ In short: For visual observing, roughly north plus the correct latitude setting is enough – one minute of work. For photography, focal length decides: up to about 200 mm a well-adjusted polar scope is sufficient; above that, software polar alignment pays off and gets you to within one arcminute in a few minutes.
Other meanings: In German, the same word (einnorden) is used for orienting a map – laying it down so that its north matches north in the terrain – and, colloquially, for setting someone straight (Wikipedia, in German). This page is about the telescope mount.
Why a mount has to be polar aligned
The stars move in circles around the celestial pole because Earth rotates. An equatorial mount follows this rotation with just one axis – but only if that axis points exactly where Earth’s axis points.
If the axis is off, the object slowly drifts out of the field despite the motor. When observing you hardly notice; in long exposures it shows up as star trails. Instruments that work altazimuthally, such as a Dobsonian or a fork mount in alt-az mode, do not need polar alignment.
The two adjustments: altitude and azimuth
The altitude (polar elevation) is the angle of the polar axis above the horizon and equals your latitude. You set it once on the scale of the latitude adjuster; any map app tells you the exact value.
The azimuth is the rotation towards north. What counts is true (geographic) north, not magnetic north – and that is exactly where the most common beginner mistake lies.
| Location (example, Central Europe) | Magnetic declination, October 2026 |
|---|---|
| Southern Baden, Germany (47.5° N, 7.6° E) | 3.4° east |
| Munich (48.1° N, 11.6° E) | 4.4° east |
| Central Germany (51° N, 10° E) | 4.2° east |
| Rügen, Germany (54.5° N, 13.5° E) | 5.4° east |
Caution: An error of around 4° from a compass app is 16 times what a 200 mm exposure can tolerate (see the table below). Use the compass only for the rough setup and Polaris for the rest. Metal tripod legs and counterweights deflect the needle as well.
Polar alignment with a polar scope: step by step
The polar scope is a small telescope inside the polar axis with an etched reticle. Polaris does not sit exactly at the pole but, in 2026, about 0.62° away from it (our own calculation from the SIMBAD coordinates). That is why it belongs on a small circle in the polar scope, not in the centre.
- Set up the tripod with the legs not fully extended and the mount pointing roughly north.
- Set the altitude to your latitude on the scale – using the adjustment screw on the mount head, not by tilting the tripod.
- Identify Polaris with the naked eye via the Big Dipper first, and only then look through the polar scope.
- Let an app calculate the position: a polar scope app or the GoTo hand controller shows where on the circle Polaris has to be right now.
- Fine adjustment only with the azimuth and altitude screws, until Polaris sits at that spot.
- Don’t move anything afterwards: if you shift the tripod, you start all over again.
Beginners often catch the wrong star in the polar scope, for example Kochab in the Little Dipper. How to find Polaris reliably is shown on our page about the North Star.
Tip for eyeglass wearers: In a German-language astronomy forum, eyeglass wearers report that they can hardly see anything through the polar scope and that the illumination drowns out the faint stars. A 90° right-angle viewer for the polar scope and the illumination at its lowest setting solve both (forum.astronomie.de, in German).
How accurate does polar alignment need to be? The table by focal length
A polar alignment error makes the stars drift slowly in declination. In the worst case it is 0.26 arcseconds per minute for every arcminute of error, because the sky turns once in 1,436 minutes. Whether that matters depends on how much sky falls on one pixel.
| Focal length | Image scale | Permissible polar error at 60 s | at 180 s |
|---|---|---|---|
| 14 mm | 55″ per pixel | over 3° | a good 1° |
| 50 mm | 15.5″ per pixel | just under 1° | 20′ |
| 135 mm | 5.7″ per pixel | 22′ | 7′ |
| 200 mm | 3.9″ per pixel | 15′ | 5′ |
| 400 mm | 1.9″ per pixel | 7′ | 2,5′ |
| 750 mm | 1.0″ per pixel | 4′ | 1,3′ |
| 1,000 mm | 0.8″ per pixel | 3′ | 1′ |
The table explains why the polar scope is better than its reputation. A well-adjusted polar scope achieves a few arcminutes – enough for telephoto lenses and short exposures with a small refractor. Beyond that, autoguiding comes into play and irons out small residual errors.
What practitioners say: Experienced astrophotographers in a German-language forum aim for less than one arcminute and, together with guiding, expose for up to 15 minutes at 380 to 910 mm without problems. A tiny residual error can even make guiding calmer, because all corrections go in the same direction (forum.astronomie.de, in German).
Polar alignment with software: plate solving instead of a polar scope
Modern programs take three images with the camera at different positions of the polar axis and calculate the error from them. The “Three Point Polar Alignment” in N.I.N.A. does not need to see Polaris and, according to users of a German-language forum, even works from a south-facing balcony (forum.astronomie.de, in German).
Beforehand you roughly align the mount as usual with a compass and the altitude setting. The software then shows live which screw you need to turn and by how much; forum users call it much more convenient than the polar scope (forum.astronomie.de, in German).
| Method | Needs | Accuracy | For whom |
|---|---|---|---|
| Rough, with compass + altitude | Nothing | a few degrees | Visual observing |
| Polar scope with app | View of Polaris | a few arcminutes | Photos up to approx. 200 mm |
| Software (e.g. N.I.N.A., SharpCap) | Camera, laptop/controller | about 1′ | Deep sky with a telescope |
| Drift alignment (Scheiner method) | Two stars, patience | very high | no view of the pole, purists |
| Automatic polar alignment device | Motorised base | about 1′ | Convenience, permanent setups |
Polar alignment without a view of Polaris
On many balconies and terraces the house blocks the view north. That leaves two options: software polar alignment using any patch of sky, or the classic drift method (Scheiner method).
With drift alignment you watch how a bright star in the south at about 30 to 40° altitude, and then one in the east or west, drifts. The direction of drift tells you which axis is off, and you correct step by step (forum.astronomie.de, in German). It is accurate, but easily takes half an hour.
Common polar alignment mistakes
- ⚠️ Wrong time or time zone in the app or hand controller, especially after the switch to or from daylight saving time – the app then shows Polaris in the wrong place (forum, in German).
- ⚠️ Wrong location entered: just a few degrees of wrong latitude shift the altitude setting.
- ⚠️ Polar scope not collimated: if it does not point exactly along the axis, you align precisely – but to the wrong spot.
- ⚠️ Altitude corrected with a tripod leg instead of the adjustment screw – that twists the azimuth at the same time.
- ⚠️ Balancing after polar alignment or swapping accessories and moving the tripod in the process.
Tip for permanent spots: Mark the positions of the tripod feet on your patio or lawn. Then Polaris will already be almost in the polar scope the next time you set up, and polar alignment takes only seconds.
Which mount makes polar alignment easy?
What matters is a supplied, adjustable polar scope and fine adjustment screws for altitude and azimuth. For a camera with a telephoto lens, a compact travel mount is the easiest way in; for a telescope with a camera, a medium-weight GoTo mount.
Easy to polar align: Skywatcher Star Adventurer GTi Wi-Fi GoTo Set
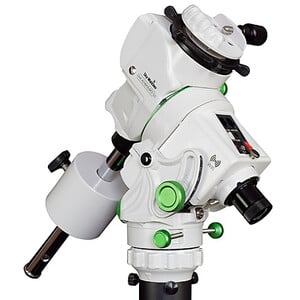
Complete set with tripod and latitude adjuster, controlled via Wi-Fi – our recommendation for a camera with a telephoto lens or a small refractor.
Price: € 665
A wider selection, including for heavier telescopes, can be found in our guide to the equatorial mount and to tracking for astrophotography.
Polar alignment FAQ
Do I need to polar align for visual observing?
Yes, but only roughly. With the altitude set and the approximate direction of north, an object stays in the eyepiece long enough while tracking; you only need precision for photography.
How often do I need to polar align?
Every time you set up again. On a permanent pier or with marked tripod positions, a check at the start of the night is enough.
Can you polar align during the day?
Roughly, yes: set the altitude and align with a compass plus a correction for magnetic declination; in a German-language forum, special apps are also mentioned for this. The fine adjustment, however, only works at night on the stars.
Does a Dobsonian telescope need polar alignment?
No. A Dobsonian moves up and down and round in a circle, i.e. altazimuthally. Polar alignment only concerns equatorial mounts, whose axis has to point at the celestial pole.
Links marked with an asterisk (*) are affiliate links. If you buy through them, we receive a small commission – the price stays the same for you.
Sources: Wikipedia: Einnorden (in German) · NOAA NCEI Magnetic Field Calculator · SIMBAD: Polaris · Threads on the German-language forum forum.astronomie.de (linked above) · Drift and image scale table: our own calculation. All accessed on 28 October 2026.
Read more on Sterngucker
- Equatorial mount – design and buying advice
- Tracking for astrophotography – mounts that follow the sky
- North Star – finding it, observing it, determining north
- Deep-sky astrophotography – getting started