By Alexander Merz · Published on · Details checked on 6 November 2026
Photographing the Moon with your phone takes three steps: turn the exposure down manually, use the longest real telephoto lens instead of digital zoom, and keep the phone steady. For craters, the phone needs a telescope or binoculars in front of it – the easiest way into astrophotography.
⭐ In short: The most common mistake is too much light, not too little. The Moon is sunlit rock and needs exposure times like a daytime photo. Without accessories it becomes a sharp but small circle; craters only appear with a phone adapter on a telescope.
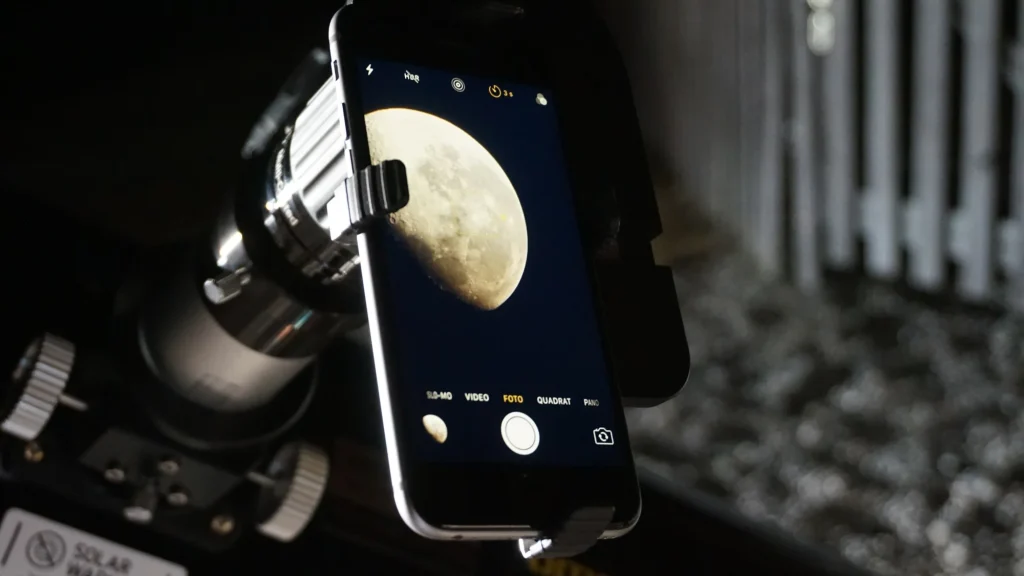
Why the Moon turns into a white blob in phone photos
The automatic exposure meters the black sky and brightens everything. The Moon itself, however, is lit directly by the Sun. For the lunar surface the old photographers’ rule “Looney 11” therefore applies: aperture f/11 and a shutter speed of 1/ISO – in other words, daylight values (Wikipedia: Looney 11 rule).
The difference in brightness is simply too large for the camera. Google puts the gap between the Moon and a moonlit landscape at more than 500,000 to 1 – too much for a single image (Google Research, 26 Nov 2019). So you have to decide: Moon with detail or landscape with detail.
The second problem is size. On average, the full Moon is only about half a degree across (1,896 arcseconds according to the NASA Moon Fact Sheet). How many pixels it gets in your photo depends almost entirely on the focal length:
| Lens (35 mm equivalent) | Moon diameter in the photo | What you see |
|---|---|---|
| Main camera, approx. 24 mm | approx. 26 pixels | bright dot above the landscape |
| 2×, approx. 48 mm | approx. 51 pixels | small disc |
| 3×, approx. 77 mm | approx. 82 pixels | lunar seas recognisable as patches |
| 5×, approx. 120 mm | approx. 128 pixels | seas, large craters at the terminator |
| 10×, approx. 240 mm | approx. 257 pixels | clear craters at half Moon |
| Phone on a telescope (650 mm, 25 mm eyepiece) | approx. 670 pixels | crater fields, mountain ranges, rilles |
Digital zoom makes the Moon bigger, but not more detailed. It only enlarges pixels that are already there. Use your phone’s longest optical zoom level and crop the image afterwards – the result is the same, but you keep the choice of framing.
The right settings for photographing the Moon with your phone
This sequence works on any phone, whether iPhone or Android. The details for each manufacturer follow in the next two sections.
- Steady the phone: tripod, wall, railing. At telephoto focal lengths, even tapping the shutter button causes camera shake.
- Night mode and flash off: night mode lengthens the exposure – exactly the wrong direction for the Moon.
- Choose the telephoto lens: the highest optical zoom level, not beyond it.
- Tap the Moon and lock the focus (iPhone: “AE/AF Lock”, Android: focus lock or Pro mode).
- Pull the exposure down until the bright edges are no longer blown out and the seas are grey instead of white.
- Use the self-timer (3 s) or a headphone remote and take a series.
| Setting | Starting value | Why |
|---|---|---|
| ISO | as low as possible (50–100) | there is enough light, high ISO only adds noise |
| Shutter speed, main camera (f/1.8) | approx. 1/2,000 s at ISO 50 | Looney 11 rule, converted |
| Shutter speed, telephoto (f/2.8) | approx. 1/800 s at ISO 50 | Looney 11 rule, converted |
| Focus | tap the Moon and lock | otherwise the autofocus hunts in the dark |
| Format | RAW, if available | more headroom when editing |
| Night mode | off | lengthens the exposure |
Tip: Look at the brightest edge, not at the centre. As soon as the edge facing the Sun shows fine structure instead of a white arc, the exposure is right. At the terminator – the boundary between light and shadow – you will then see the most craters.
Photographing the Moon with an iPhone
Night mode switches on by itself in low light – for the Moon you switch it off. You do this with the Night mode button in the Camera app (Apple Support: Night mode). Then choose the highest telephoto level your model offers.
The most important iPhone gesture is a long press on the Moon. “AE/AF Lock” then appears, and next to the focus box you drag the exposure slider down (Apple Support: Camera tools). From the iPhone 16 with iOS 18.2 onwards, the lock can also be set with a light press on Camera Control (Apple Support: Camera Control, German page).
The Apple Camera app has no real shutter speed setting. If you want to set ISO and time manually, you need a camera app with a manual mode from the App Store. For most Moon photos, however, exposure compensation with locked focus is enough.
| Goal | How to do it on the iPhone |
|---|---|
| Night mode off | tap the Night mode icon at the top |
| Lock focus and exposure | tap and hold the Moon until “AE/AF Lock” appears |
| Expose darker | drag the sun icon next to the focus box down |
| More headroom | turn on ProRAW (Pro models only) |
| Shoot without shake | self-timer or volume button on wired headphones |
Photographing the Moon with Samsung and other Android phones
Android phones almost always have a Pro or manual mode – use it. There you set ISO to the lowest value and the shutter speed to the starting value from the table above. You set the focus manually to infinity or tap the Moon.
On Samsung, it is worth checking the Scene Optimizer. According to Samsung, beyond 25× zoom it applies an AI detail enhancement that recognises the Moon and computes one image from more than ten frames (Samsung Support, 2023). The result looks impressive, but shows more than the optics themselves resolve.
Caution: If you want your own Moon, switch off the Scene Optimizer. You do this in the Camera app settings (Samsung Support: Scene Optimizer, German page). Other manufacturers use similar AI processes; the topic sparked a broad debate in 2023 (Süddeutsche Zeitung, in German).
Google Pixel has its own astrophotography mode, but it is designed for stars. It stacks long exposures for faint stars (Google Research) – the wrong direction for the bright Moon. Here, too: Night Sight off, choose telephoto, turn the exposure down.
Photographing lunar craters: phone on a telescope or binoculars
With an eyepiece in front of it, your phone becomes a Moon photographer. The method is called afocal photography: the phone lens looks straight through the eyepiece, and the telescope provides the magnification. Even a small beginner’s instrument such as the Sky-Watcher Heritage 130 Tabletop DobsonianSkywatcher Dobson Telescope N 130/650 Heritage FlexTube shows the whole Moon with a 25 mm eyepiece, filling about a quarter of the round eyepiece view (our own calculation: 26×, 52° apparent field).
Handheld sometimes works, with an adapter almost always. In the German-language forum of astronomie.de, beginners report that handheld shots through the eyepiece can succeed, but that an adapter is much more reliable (thread “Simple photography”, 2025, in German; “Phone Moon”, 2018, in German). The most common frustration is aligning phone, holder and eyepiece (thread “Focus problems”, 2024, in German).
Our phone adapter: Bresser Deluxe smartphone holder
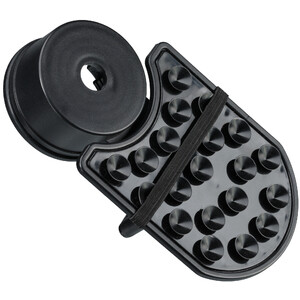
Clamps the phone to eyepiece barrels from 22 to 38 mm – that covers almost every 1.25-inch eyepiece. Without a telescope, monocular or binoculars, the adapter on its own is of no use.
Price: € 14.90
- First by eye: centre the Moon with the eyepiece of the longest focal length (e.g. 25 mm) and focus.
- Clamp the holder on, place the phone, slide the lens to the centre of the eyepiece until the image is a full, evenly bright circle.
- Zoom only slightly on the phone (about 2×) until the black edge disappears.
- Focus with the telescope, not the phone – lock the focus on the phone.
- Turn the exposure down and take a series or a short video.
A video is often better than a single photo. At high magnification, atmospheric turbulence makes the image wobble constantly; experienced imagers therefore film and let programs such as AutoStakkert or RegiStax pick and stack the sharpest frames (thread “Beginner in Moon photography”, 2024, in German). How this works is explained in our guide to planetary photography.
Tip: A Moon filter mainly spares your eyes while setting up. For the photo itself you control brightness with the exposure; the filter helps if your camera app does not turn down far enough. A suitable 1.25-inch filter is the Apertura 1.25" Moon FilterOmegon Premium Moon Filter 1.25″.
When the Moon is most photogenic
For craters, full Moon is the worst phase. The Sun then shines straight down on the lunar surface, shadows are missing and the image looks flat. With a waxing or waning Moon, crater walls cast long shadows – most clearly at the terminator (more on this under the Moon and its phases).
| Subject | Best phase and time | Equipment |
|---|---|---|
| Moon above a landscape | full Moon shortly after rising, twilight | phone alone, telephoto level |
| Crescent with earthshine | thin crescent in the evening or morning | phone on tripod, main camera |
| Craters and mountains | half Moon, waxing or waning | phone on telescope |
| Blood moon | total lunar eclipse | tripod, longer exposure, night mode allowed |
Moon plus landscape is easiest at twilight. The sky is then still bright enough for the foreground and the Moon to fit into a single image. A building or mountain in the frame makes the Moon look bigger without needing more zoom.
The most common mistakes – and what helps
| Problem | Cause | Solution |
|---|---|---|
| White blob without detail | automatic exposure meters the dark sky | tap the Moon, pull the exposure down |
| Moon blurry, mushy | digital zoom beyond the optical level | highest optical level, crop later |
| Shaken | tapping the shutter button | tripod, self-timer |
| Moon “too pretty” | AI scene recognition adds computed detail | Scene Optimizer or AI mode off |
| Black ring at the eyepiece | phone lens not centred | readjust the holder, zoom slightly |
| Image wobbles on the telescope | atmospheric turbulence | video instead of photo, pick the best frames |
For advanced users: more focal length for the Moon
If you want more after your first crater images, you mainly need focal length. Compact Maksutov telescopes pack a lot of it into a short tube and show no colour fringing.
🚀 If you want more: Maksutov with GoTo
The most focal length per centimetre of instrument, without colour fringing. The GoTo mount finds the Moon by itself, which makes setting up at high magnification much easier – and the phone adapter still fits.
➜ Sky-Watcher Skymax 127 mm with AZ-GTi Mount & TripodSky-Watcher Skymax-127 AZ-GTi GoTo WiFi – $995.00€ 775
FAQ about phone Moon photos
Why is the Moon so small in my phone photo?
Because it is only half a degree across and the main camera has a wide-angle lens. At around 24 mm 35 mm-equivalent focal length, it gets only about 26 pixels in diameter on a 12-megapixel image (our own calculation). Only real focal length makes it bigger: a telephoto lens or a telescope.
Can you photograph lunar craters with a phone?
Yes, through a telescope or binoculars with a phone adapter. Without anything in front, only phones with a strong optical telephoto show the largest craters at the terminator. Half Moon gives the best results.
Which app do I need for Moon photos?
None to start with: the normal Camera app with locked focus and the exposure pulled down is enough. A camera app with a manual mode is worthwhile if you want to set shutter speed and ISO precisely or save RAW.
Are Samsung’s Moon photos real?
They are based on real shots, but are sharpened with AI. Samsung describes how the Scene Optimizer recognises the Moon and applies a detail enhancement. With the Scene Optimizer switched off, you see what the optics themselves deliver.
How do I photograph a blood moon with my phone?
During a total lunar eclipse the Moon is much darker, so for once a longer exposure is right. A tripod is a must, and night mode may stay on. Background on the red Moon is in our article on the blood moon.
Do I need a Moon filter for photography?
Not necessarily. It makes setting up at the eyepiece more comfortable and helps if your camera app does not turn the exposure down far enough.
Read more
- Photographing the Moon with a camera and telephoto lens – the next step after the phone
- Smartphone astrophotography – stars, Milky Way, star trails
- Observing the Moon with a telescope – which instrument for craters
Sources: Looney 11 rule (Wikipedia) · NASA Moon Fact Sheet · Google Research (2019) · Apple Support · Samsung Support · Experiences from the German-language forum forum.astronomie.de (threads linked in the text). Pixel and exposure values: our own calculation.
* Affiliate link: if you buy through this link we may earn a small commission from Astroshop, High Point Scientific or another linked retailer, at no extra cost to you.